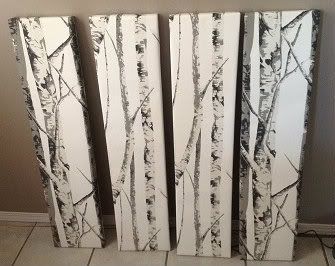
I was completely inspired by the interior design of a show that I watch called Once Upon a Time. It was the "Evil Queen's" office and the more I saw it the more I just had to have a room like that.

I decided that I would do a similar design in my bedroom. First off I just had to have that birch tree wallpaper! I ended up finding it online for a reasonable price.
Last year I had taken a vow, after removing 4+ layers of wallpaper off the walls at a flip property, that I would never wallpaper again. Also, the fact that my bedroom is not the scale as the room in the show, I did not think that wallpapering all of the walls would do the room justice not to mention that purchasing lots of wallpaper can get quite pricey. So, I thought of a way to incorporate my favorite wallpaper without breaking the bank or applying it to any walls. I figured this was a good idea for renters too who are unable to wallpaper a wall anyways.
I ended up finding a large canvas painting with 4 long skinny canvases attached at a yard sale for $10. I don't want to say the painting was ugly, but it just wasn't for me. I didn't know what I was going to do with it at the time, but I felt bad about it because I knew my intentions with the painting wasn't to keep it how it was. Besides, $10 was a great deal for such a big canvas with an even bigger potential!
I decided to separate the canvases so that there were 4 small skinny ones instead of one large one. It was held together with staples so it was rather time consuming but not too hard. As you can see from the picture, I started to spray paint them but changed my mind halfway through.

Because of the title of my blog I am guessing you know what I decided to do instead. Hehe. I took that amazing birch wallpaper and laid it out on the floor. I set the canvas on top and figured I could do two at a time with the length of the canvas.
I folded the top of the wallpaper over the tops of the canvas making sure I would have enough to wrap it.

I then cut the wallpaper to the size of the canvas.

I folded the wallpaper in half so that I could have a guide for where I would need to cut so that I could cut perfect halves.

I opened the wallpaper up and cut straight down the middle on my creased line.

I figured for the next step you could use a staple gun or a hot glue gun. I chose a hot glue gun because for me, they are easier to work with, not to mention the fact that our staple gun is currently on the fritz.

On the opposite end I had cut a little extra so I pulled the wallpaper over the canvas and again, folded a guide for myself so that I could cut it to the perfect length.

Pull tight and hot glue the opposite side.
Next the fun part. Folding like the canvas is a present. Fold one corner into canvas and crease. Fold up flap and glue the flap to the canvas. In fear that I could not explain the folding process better then I have, I did a 3 step picture process below.

Repeat this step to all 4 corners.

Hot glue both sides to the back of the canvas.

And here we have it! 4 wallpapered canvases ready to go!

Now wasn't that fast and easy? Very inexpensive for a great way to cover up a boring wall as well. If only I would have thought of this when I was a renter!
Stay tuned for more of my upcoming DIY projects!
Marissa <3